Custom Wood Counter

How We Built a Custom Wood Counter Display
A few years back, we got a call from a client who wanted a simple, durable custom wood counter for his gallery store. The brief was straightforward: it had to be sturdy, clean-looking, and capable of lasting a decade or more. The real challenge was keeping the build simple, precise, and budget-friendly. After a few design iterations, we landed on a clean counter layout that checked every box—and the client loved it.
Small choices make a big difference. Below is our step-by-step approach—from requirements, to design and materials, to finishing—to help you plan a custom counter of your own. If you’re considering furniture builds too, explore our related guide on wood counter display units or our IKEA & Wayfair furniture assembly page for more ideas.
Table of Contents
Project Requirements: Durable Store Counter with Sunken Register
- A sturdy counter unit with a recessed area for a cash register
- Clean, simple lines—no unnecessary complexity
- Cost-effective, readily available materials
Design & Materials: From Sketch to 3D Model and Cut List
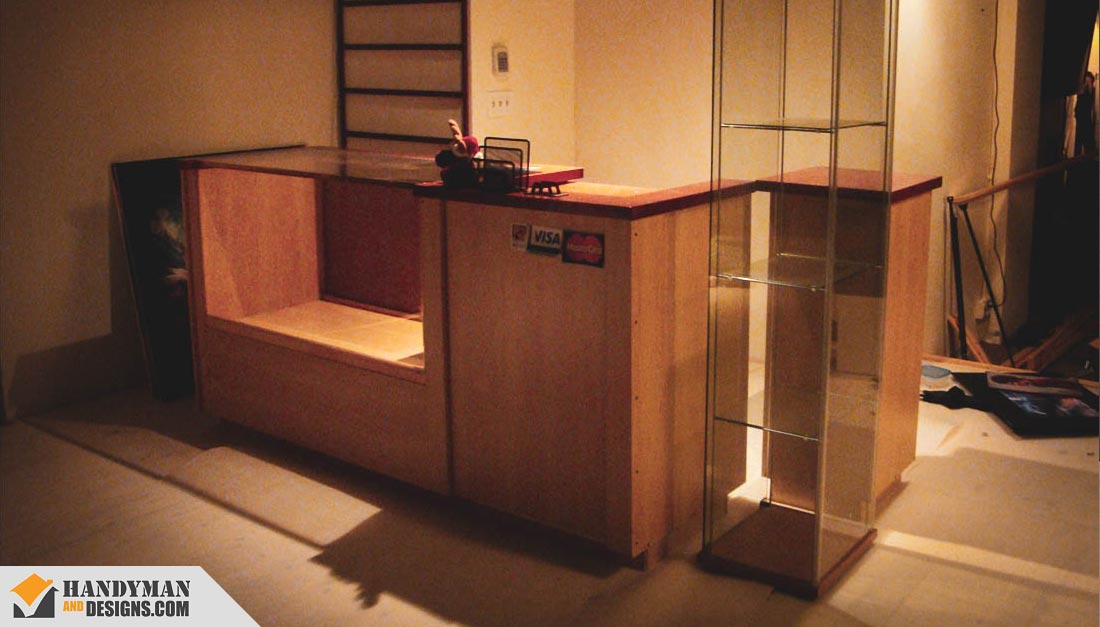
For any custom counter or point-of-sale display, start with a clear sketch. Quick drawings help you weigh options and lock a layout before you cut anything. We refine our best concept in a 3D program like 3ds Max so every dimension and joinery choice is thought through.
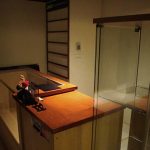
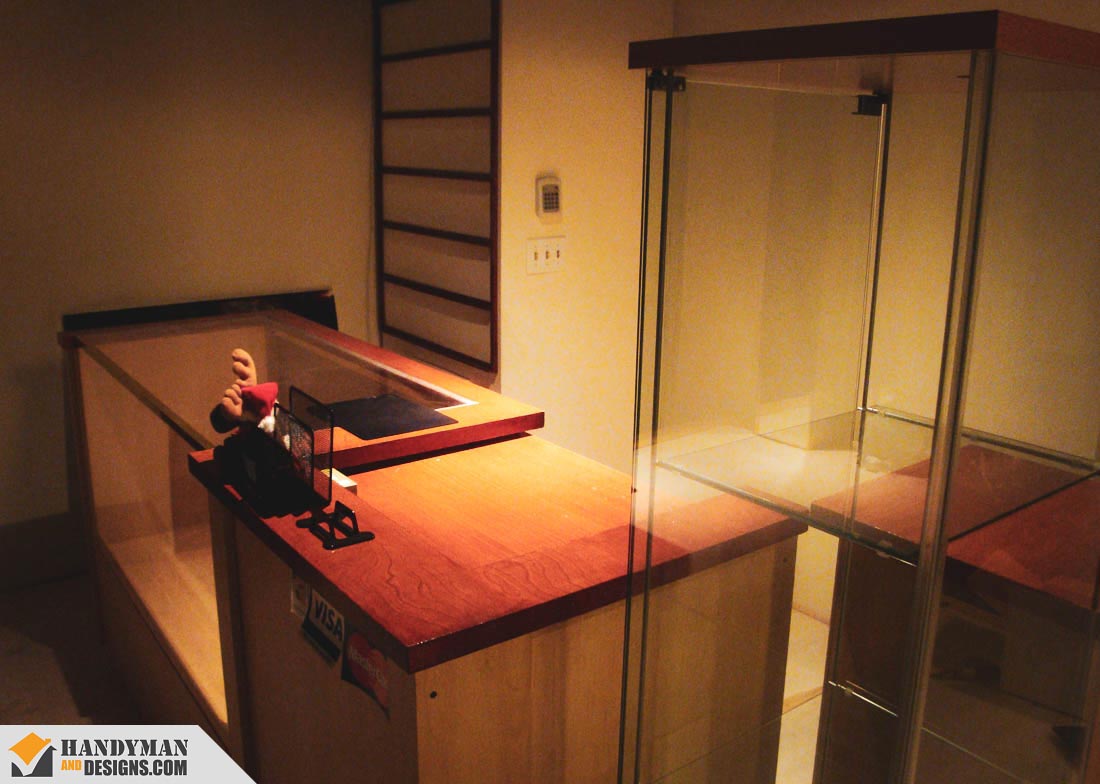
Once the 3D design is polished, we confirm it with the client, then move to a simple cut list and materials run. Our layout included a recessed register bay, a rear compartment sized for a compact fridge, and a front display window for featured items. We paired the main counter with a narrow side surface, added a tall glass case from IKEA, and used a modular DVD shelf on the back wall for extra retail storage.

Build & Finish: Edge Banding, Sanding, Stain, and Varnish
We laminated a finished hardwood board to plywood for a thicker, more stable top. For the edges, we used natural oak edging that can take stain, bonded with adhesive. After trimming with a razor, we eased the corners and sanded to a smooth radius. A rich stain and durable varnish completed the surface and tied the whole counter together.
From first sketch to last coat, the goal stayed the same: simple, solid, and clean. The result is a hardworking counter that fits the space, supports daily retail use, and looks good doing it. If you’re planning a similar build, browse our services for custom carpentry or compare tool options below.
Tool Recommendations
Outils recommandés
Note: When you make a purchase through our links, we may earn commissions from Amazon, ClickBank or other retailers at no extra cost to you. Our recommendations are based on our personal and professional experience using products we suggest, and we recommend them because we believe they are genuinely helpful, not because of the small commissions we may receive. Please only purchase a product if you believe they will help you achieve your goals.
Note : Lorsque vous effectuez un achat via nos liens, nous pouvons recevoir des commissions d’Amazon, ClickBank ou d’autres détaillants, sans frais supplémentaires pour vous. Nos recommandations sont basées sur notre expérience personnelle et professionnelle avec les produits que nous suggérons, et nous les proposons parce que nous croyons qu’ils sont réellement utiles, pas à cause des petites commissions que nous pourrions toucher. Achetez seulement si vous pensez que ces produits vous aideront à atteindre vos objectifs.

Same-Side Operation Pocket Hole Jig Kit
We used a Kreg pocket hole jig for years, but the vise-grip clamp always slowed things down. This same-side operation jig is a total upgrade: no flipping the board, no plastic to flex, and you can drill the pocket holes the moment you set it in place. Solid metal construction and faster workflow make it the pocket-hole rig we actually enjoy using.
View on Amazon
Gabarit à trous de poche à opération du même côté
Nous avons utilisé un gabarit à trous de poche Kreg pendant des années, mais la pince-étau ralentissait toujours le travail. Ce gabarit à opération du même côté est une véritable amélioration : pas besoin de retourner la pièce, aucune pièce en plastique qui fléchit, et vous pouvez percer les trous de poche dès qu’il est en place. Sa construction entièrement en métal et son flux de travail plus rapide en font l’outil à trous de poche que nous aimons vraiment utiliser.
Voir sur Amazon

DEWALT 20V MAX XR Drill and Impact Driver Kit
We’ve run through plenty of tools over the years, and this Dewalt set is one we’d buy again in a heartbeat. The drill has the right mix of power and control, the impact driver is a workhorse, and having two batteries means no excuses when one runs out. It’s not flashy—it’s just dependable. And in our line of work, that’s what counts!
View on Amazon
Ensemble DEWALT 20V MAX XR – Perceuse et Visseuse à chocs
On en a passé des outils au fil des années, et cet ensemble Dewalt est de ceux qu’on rachèterait sans hésiter. La perceuse offre le bon équilibre entre puissance et contrôle, la visseuse à chocs est un vrai cheval de travail, et avec deux batteries, plus d’excuses quand l’une tombe à plat. Ce n’est pas tape-à-l’œil—c’est juste fiable. Et dans notre métier, c’est ça qui compte !
Voir sur Amazon

DEWALT 20V MAX 7.25in Circular Saw
This 20V Dewalt circular saw is the perfect mix of muscle and control. The brushless motor keeps it powerful yet quiet, while the electronic brake stops the blade fast and the 20V battery provides plenty of runtime. We also like that it’s light enough to use overhead yet feels rock-solid for long rip cuts. We’ve run it through framing lumber and cabinet plywood—and every time it delivers clean, confident results.
View on Amazon
Scie circulaire DEWALT 20V MAX 7,25 po
Cette scie circulaire Dewalt 20V est le parfait mélange de puissance et de contrôle. Son moteur sans balais demeure puissant tout en restant silencieux, tandis que le frein électronique arrête la lame rapidement et que la batterie 20 V offre une excellente autonomie. On aime aussi le fait qu’elle soit assez légère pour être utilisée au-dessus de la tête tout en restant bien stable pour les longues coupes en longueur. Nous l’avons mise à l’épreuve dans du bois de charpente et du contreplaqué d’armoire—et chaque fois, elle livre des résultats nets et assurés.
Voir sur Amazon
Tool Purchases to AvoidAchats d'outils à éviter
Not every tool on the shelf is worth a spot in your precious toolbox. Skip the ones that slow you down, break too soon, or test your sanity more than your skills—the list below highlights a few worth avoiding.
Tous les outils sur la tablette ne méritent pas une place dans votre coffre. Évitez ceux qui vous ralentissent, qui cassent trop vite ou qui mettent plus à l’épreuve votre patience que vos compétences—la liste ci-dessous en présente quelques-uns à éviter.

Skip the Corded No-Clutch Drill – Imagine handing a rocket engine to a toddler. That’s what it feels like using one of these for assembly: uncontrolled, overpowered, and guaranteed to end with regrets. These don’t care if you’re working on pine, plywood, or priceless cabinetry. Hit the trigger, and they’ll happily launch a screw to the other side like it’s training for the Olympics!
Évitez la perceuse filaire sans embrayage – Imaginez donner un moteur de fusée à un enfant… Voilà ce que ça fait d’utiliser ça pour un montage : incontrôlable, trop puissant et garanti de finir en regrets. Peu importe que ce soit du pin, du contreplaqué ou une armoire précieuse : appuyez sur la gâchette et la vis traversera joyeusement de l’autre côté comme si elle s’entraînait pour les Jeux olympiques !

Corded Circular Saw
A corded circular saw always seems to find a way to tangle or snag just when you’re focused on the cut. You’ve got to babysit the extension cord, plan your movements around it, and hope it doesn’t unplug mid-rip. The power is fine—but the constant cord management turns every job into a dance you didn’t sign up for.
Scie Circulaire à Fil
Une scie circulaire à fil trouve toujours un moyen de s’emmêler ou de se coincer au moment où vous êtes concentré sur la coupe. Il faut surveiller le cordon rallonge, planifier vos mouvements autour de lui et espérer qu’il ne se débranche pas en plein trait de scie. La puissance est là—mais la gestion constante du fil transforme chaque travail en une danse imprévue.
Need Help Building a Custom Counter?
A Custom Wood Counter isn’t just a surface—it’s the kind of detail that turns a space into a gathering spot. We get a kick out of matching grain and hardware so the final piece feels naturally meant to be there.
- See real installs in our Custom Projects gallery
- Need fabrication plus a tidy install? Check Custom Build Services
- Budgeting made simple: check out our Handyman Rates
- Have a vision ready to pin down? Contact Us and start planning today!
Whether it’s a café counter or a studio workbench, a well-built surface becomes the room’s heartbeat. We enjoy every cut, sand, and polish that gets it there.