Outdoor Gallery Panels – Build, Wrap, and Mount for Exhibits

Assembly Projects
Outdoor Gallery Panels: Styrofoam Core, Cloth Wrap, Pro Mounting
The job? Build some gallery panels for an outdoor art show at Second Cup du Parc – Montréal. Honestly though, it felt less like a commission and more like a craft project gone delightfully rogue. We grabbed Styrofoam boards for the backbone (carry, lift or move with zero back trauma!), wrapped everything in black cloth (because who doesn’t want their art to look like it’s at a fancy black-tie event?), and squared it all up with neat wooden frames (more DIY on our Handyman Services page). Once the panels looked sharp, we packed them up, hauled them across town, and set them in place. By the time the artists arrived with their pins, the panels were standing tall, and we were ready with coffee in one hand, and a handful of extra pins in the other.
Table of Contents
- 1. Test Fitting: Does This Thing Even Fit?
- 2. Start the Build Sequence: Attack of the Styrofoam
- 3. Dressing Up: Black Cloth, Meet Styrofoam
- 4. Framing Time: Channeling Our Inner Red Green
- 5. Transport: Enter the Tiny Truck
- 6. On Site: Fence Meets Panel
- 7. Voilà: The Big Reveal
- Tool Recommendations
- Custom Created Gallery Panels? Get in Touch

Test Fitting: Does This Thing Even Fit?
Before building a small army of panels, we played it safe with a quick site survey. We hauled one lonely draft panel to the site and stood it up like a student on presentation day. It was a bit awkward, but the point was clear: does it fit, does it look right, and can we move forward without embarrassing ourselves? The answer was yes—thumbs up, full speed ahead.

Start the Build Sequence: Attack of the Styrofoam
Back in the shop, it was time to slice up big sheets of Styrofoam. Imagine carving an enormous marshmallow, only less tasty and more squeaky. With tape measures in one hand and knives in the other (utility-knife safety), we cut each board to size. Precision was key… but mostly we just didn’t want crooked panels staring back at us later.

Dressing Up: Black Cloth, Meet Styrofoam
Every board got a wardrobe upgrade: spray adhesive on the Styrofoam, cloth stretched tight, folds pinned in place. We lined the seams right where the future wood frames would sit, so nobody would see our fabric origami. Honestly, it felt like dressing the panels for a night at a black-tie gala—minus the champagne. Fancy gallery vibes here.

Framing Time: Channeling Our Inner Red Green
Next up, the wood beams. We measured, cut, and pieced them together like a big wooden puzzle (see our Furniture Assembly projects). Pilot holes, washers, screws, and bolts locked everything tight, because unlike Red Green’s famous love for duct tape see here, we figured real hardware might hold up better. The result? Panels that were sturdy, square, and not about to fall apart mid-show!

Transport: Enter the Tiny Truck
Panels built, now came the fun part—moving them. We stacked, padded, and packed with ratchet straps them into a truck that looked comically undersized for the job. It was basically a clown car for art panels. Thanks, U-Haul. Somehow, everything fit, and nothing snapped in half on the way. Victory.

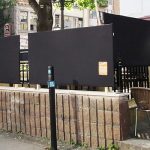
On Site: Fence Meets Panel
At the café, it was Go-Time! We propped the panels up against the fence, checked levels with a spirit level, and locked them in place. The fence probably didn’t know it was about to become an art gallery (more on our Handyman Services), but it played along. By the end, the panels stood in a neat row like soldiers waiting for inspection—except a lot classier and way less disciplined.

Voilà: The Big Reveal
Once the art went up, the whole thing transformed. Coffee shop by day, gallery by… well, still day—basically a pop‑up gallery, but with a lot more people staring at walls instead of laptops. The event went off without a hitch, and the panels held strong. In the end, we had a fun build, a good laugh, and a project that turned out better than we could’ve planned.
Tool Recommendations
Outils recommandés
Note: When you make a purchase through our links, we may earn commissions from Amazon, ClickBank or other retailers at no extra cost to you. Our recommendations are based on our personal and professional experience using products we suggest, and we recommend them because we believe they are genuinely helpful, not because of the small commissions we may receive. Please only purchase a product if you believe they will help you achieve your goals.
Note : Lorsque vous effectuez un achat via nos liens, nous pouvons recevoir des commissions d’Amazon, ClickBank ou d’autres détaillants, sans frais supplémentaires pour vous. Nos recommandations sont basées sur notre expérience personnelle et professionnelle avec les produits que nous suggérons, et nous les proposons parce que nous croyons qu’ils sont réellement utiles, pas à cause des petites commissions que nous pourrions toucher. Achetez seulement si vous pensez que ces produits vous aideront à atteindre vos objectifs.

WEN MM0713 7.25-Inch Compact Sliding Miter Saw
Compact, clever, and easy to carry—this saw won’t break your back before you cut your first board. The built-in laser guide makes you look like a precision wizard, even if you still measure twice (or thrice). Best of all, the sliding rails move inward, so you can push it right up against a wall instead of losing half your garage space.
View on Amazon
WEN MM0713 Scie à onglets coulissante compacte 7,25 po
Compacte, astucieuse et facile à transporter — cette scie ne vous brisera pas le dos avant même de couper votre première planche. Le guide laser intégré vous fait passer pour un magicien de la précision, même si vous mesurez encore deux (ou trois) fois. Et le meilleur? Les rails coulissants se déplacent vers l’intérieur, ce qui vous permet de la coller directement contre un mur sans perdre la moitié de l’espace de votre garage.
Voir sur Amazon

BLACK+DECKER 20V Max Drill & Home Tool Kit, 68 Piece
When duct tape won’t cut it, this kit will. Packed with bits and essentials for everyday fixes, it's lightweight, practical, and ready to make you look like you know what you’re doing. Great for weekend warriors, furniture fighters, and casual fixers. If you’re planning to build a spaceship, look elsewhere—but for everyday fixes, this kit nails it.
View on Amazon
BLACK+DECKER 20V Max Drill & Home Tool Kit, 68 pièces
Quand le duct tape ne suffit plus, ce kit prend le relais. Rempli d’embouts et d’outils essentiels pour les petites réparations du quotidien, il est léger, pratique et te donne l’air de savoir ce que tu fais (même si c’est pas toujours le cas). Parfait pour les guerriers de fin de semaine, les combattants de meubles et les bricoleurs occasionnels. Si tu veux construire une fusée, passe ton tour — mais pour les réparations de tous les jours, ce kit fait la job.
Voir sur Amazon

Intertool Storm 38-Piece Ratchet Screwdriver Set
Sometimes the right tool is the one that’s easy to find and simple to use. This compact ratchet screwdriver set comes loaded with bits and sockets for everyday tasks, packaged in a smart case that prevents the usual “missing piece” chaos. Whether you keep it at home, in your car, or at the office, it’s a reliable go-to for small but important fixes.
View on Amazon
Ensemble de tournevis à cliquet 38 pièces Intertool Storm
Parfois, le bon outil est simplement celui qui est facile à trouver et simple à utiliser. Cet ensemble compact de tournevis à cliquet contient des embouts et des douilles pour les tâches quotidiennes, rangés dans un coffret astucieux qui évite le chaos habituel des « pièces manquantes ». Que vous le gardiez à la maison, dans votre voiture ou au bureau, c’est un indispensable fiable pour les petites mais importantes réparations.
Voir sur Amazon
Tool Purchases to AvoidAchats d'outils à éviter
Not every tool on the shelf is worth a spot in your precious toolbox. Skip the ones that slow you down, break too soon, or test your sanity more than your skills—the list below highlights a few worth avoiding.
Tous les outils sur la tablette ne méritent pas une place dans votre coffre. Évitez ceux qui vous ralentissent, qui cassent trop vite ou qui mettent plus à l’épreuve votre patience que vos compétences—la liste ci-dessous en présente quelques-uns à éviter.

Skip the Corded No-Clutch Drill – Imagine handing a rocket engine to a toddler. That’s what it feels like using one of these for assembly: uncontrolled, overpowered, and guaranteed to end with regrets. These don’t care if you’re working on pine, plywood, or priceless cabinetry. Hit the trigger, and they’ll happily launch a screw to the other side like it’s training for the Olympics!
Évitez la perceuse filaire sans embrayage – Imaginez donner un moteur de fusée à un enfant… Voilà ce que ça fait d’utiliser ça pour un montage : incontrôlable, trop puissant et garanti de finir en regrets. Peu importe que ce soit du pin, du contreplaqué ou une armoire précieuse : appuyez sur la gâchette et la vis traversera joyeusement de l’autre côté comme si elle s’entraînait pour les Jeux olympiques !
Custom Created Gallery Panels – Get in Touch!
Our gallery panels weren’t born in a fancy workshop with laser cutters and dust-free rooms… they came together with a bit of Styrofoam, some cloth, a handful of bolts, and a lot of laughs. This was a good old-fashioned DIY job, the kind where measuring tape doubles as décor and transport feels like a circus act. The fun part wasn’t making it look like a million bucks—it was proving that with some simple materials and imagination, you can create something cool without draining the wallet. We enjoy building these scrappy little projects, not because they’re perfect, but because they’re ours. And if you’ve got an idea for a quirky build of your own, we’d love to hear about it!
- First things first, take a peek at our current rates: View our Rates
- Curious about what else we do? Browse through our Handyman Services » Furniture Assembly. Ready to book? Contact Us