Epoxy Cement Countertop Journey – From Plywood Base to Glossy Finish

Assembly Projects
A Plywood Base to an Epoxy Shine Finish – The Countertop Journey
What happens when curiosity meets a plywood blank and a bold idea? You get an adventure in materials—part design lab, part “let’s see what happens!” This is our first run, told straight: dialing in mixes, rethinking timing, and embracing those “well, that was educational” moments. It’s not a highlight reel; it’s about the small wins, the near-misses, and the moment the surface finally caught light and said, “Hell yeah—this works!” Follow along as a countertop takes shape and the design grows right along with it on this bold new adventure!
Table of Contents
- 1. The Base Camp: Building a Solid Start
- 2. Glue, Screws, and Battle Scars
- 3. Cement Layers: Where Texture Takes Shape
- 4. The Rough Beauty of Imperfection
- 5. Dust Wars: Sealing the Space for Epoxy
- 6. Unwrapping the Gloss: The Big Reveal
- 7. Sharp Edges, Soft Fixes – Final Touch-Ups
- 8. Texture That Tells a Story
- 9. Final Notes: Looking Back
- Tool Recommendations
- Need Help with a Project?

The Base Camp: Building a Solid Start
Every adventure needs a beginning. Ours started with building up the countertop edges to hit a solid 1.5-inch lip. Instead of stacking three identical boards like a lazy copy-and-paste in Adobe Photoshop, we kept the top layer whole and lined the underside with slimmer 3-inch strips. Three staggered layers gave us the height we needed, while overlapping seams added strength to the structure—pieced together like a Jenga tower, only with actual purpose.

Glue, Screws, and Battle Scars
Once the boards were in place, we sealed the alliance with wood glue and particle board screws. After filling and sanding, the surface looked smooth, almost too smooth—so we roughed the surface up with a paint scraper, carving grooves like battle scars to give the cement something to hold and adhere to. Finally, we wrapped the base in plastic, readying the countertop for the next chapter: its baptism in Liquid Cement!
Curious about what else we do? Browse through our Handyman Services

Cement Layers: Where Texture Takes Shape
Now the real transformation began. Using Ardex Feather Finish (a DIY legend in the countertop world), we built up 4–6 layers. By the later rounds, instead of coating everything flat, we worked in thin patches. Each mix came out slightly different, leaving behind light and dark tones that gave the surface unexpected depth. It turned into one of those “happy accidents” that we proudly claimed later *cough* “yeeaaah, we totally meant to do that.”

The Rough Beauty of Imperfection
For the edges, we got creative: a sponge pressed in texture, while the top of a paintbrush added additional dips and pulls, making the countertop look like it had history. After a gentle sanding to tame the sharp bits, the stage was set for epoxy to do its upcoming magic.
View a step-by-step guide on a beautiful mess.

Dust Wars: Sealing the Space for Epoxy
Dust and bugs are epoxy’s worst enemies, so we gave the area a quarantine zone. Plastic walls went up, vacuums roared, and every speck and particle was banished. With the area sealed, we mixed and poured the epoxy (Magic Resin | Epoxy Resin for Table Tops). It flowed like honey—messy, unstoppable, and beautiful, all at the same time. Drips ran off the sides, but we weren’t worried; the floor was sealed up tighter than a burrito in foil! To finish, we passed a blowtorch over the surface, driving out air bubbles before they had a chance to set in.

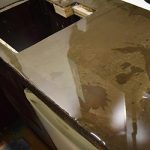
Unwrapping the Gloss: The Big Reveal
The next day felt like unwrapping a present. Peeling away the plastic, we found a glossy, glass-smooth surface with epoxy hugging the edges. No bald spots, no disasters—just a countertop that actually looked like, well, A Countertop! And surprisingly, it looked both good and expensive, like a designerly piece of construction art. For a first-time adventure, we enjoyed this serious win.
For more custom builds, visit our Custom Projects Photo Gallery.

Sharp Edges, Soft Fixes – Final Touch-Ups
The only hiccup? The epoxy edges were a little sharper than we liked. A light sanding softened them up, and the rest we left untouched—because sometimes “don’t mess with it” is the best design choice.

Texture That Tells a Story
In the end, those patchy cement layers gave us something money can’t buy: Character. The subtle contrast between light and dark areas made the countertop unique, almost like a stone surface with its own fingerprint. And just like that, our plywood experiment ended in a one-of-a-kind epoxy-cement countertop—ready for everyday use, and maybe ready to inspire both yours and ours next big DIY adventure to come! On to the next challenge!

Final Notes: Looking Back
If there’s one thing we’d change with a time machine, it would be our choice of wood panels. Around a sink, water resistance matters more than we gave it credit for. Layered plywood panels would have been the smarter option. Particle board, on the other hand, has a dark side—once it gets wet, it swells and bulges like it’s holding a grudge. Over time, that can crack a sealed sink connection and cause trouble down the road. Lesson learned: the base matters just as much as the glossy finish.
Tool Recommendations
Outils recommandés
Note: When you make a purchase through our links, we may earn commissions from Amazon, ClickBank or other retailers at no extra cost to you. Our recommendations are based on our personal and professional experience using products we suggest, and we recommend them because we believe they are genuinely helpful, not because of the small commissions we may receive. Please only purchase a product if you believe they will help you achieve your goals.
Note : Lorsque vous effectuez un achat via nos liens, nous pouvons recevoir des commissions d’Amazon, ClickBank ou d’autres détaillants, sans frais supplémentaires pour vous. Nos recommandations sont basées sur notre expérience personnelle et professionnelle avec les produits que nous suggérons, et nous les proposons parce que nous croyons qu’ils sont réellement utiles, pas à cause des petites commissions que nous pourrions toucher. Achetez seulement si vous pensez que ces produits vous aideront à atteindre vos objectifs.

Ardex Feather Finish
Feather Finish isn’t just a name—it’s a Promise. This stuff goes down so smooth you’ll wonder if it’s secretly skincare for your floor. Mix with water, spread thin, and in 15 minutes you’re ready to cover it. Perfect for hiding sins, bumps, and the ghosts of Bad Renovations Past.
View on Amazon
Finition plume Ardex
Feather Finish n’est pas juste un nom — c’est une promesse. Ce mélange s’applique tellement bien que vous vous demanderez si ce n’est pas secrètement une crème de soin pour votre plancher. Mélangez avec de l’eau, étendez en mince couche, et en 15 minutes vous êtes prêt à recouvrir. Parfait pour cacher les défauts, les bosses et les fantômes des vieilles rénos ratées.
Voir sur Amazon

Magic Resin Epoxy
Our cement countertop project had “DIY” written all over it until Magic Resin turned it into something worthy of a design magazine. The clarity is Insane. You can practically see your reflection plotting tomorrow’s coffee routine. Bonus: it resists yellowing, so it’ll still look great long after the honeymoon phase.
View on Amazon
Magic Resin Epoxy
Notre comptoir en ciment criait « DIY » jusqu’à ce que Magic Resin le transforme en une pièce digne d’un magazine de design. La clarté est Folle. On peut presque voir son reflet en train de planifier le café du lendemain. Bonus : il résiste au jaunissement, donc il restera superbe bien après la phase de lune de miel.
Voir sur Amazon

Holothurian Caulking Gun
Nobody brags about owning a caulking gun, but when you’ve got a good one, You’ll Notice. This model is tough, easy to handle, and won’t leave you with clumpy lines that scream “first timer.” The included orange bead smoothers do the finishing work for you, turning messy gaps into clean, professional seals. When you’re done, your caulk lines will look like you hired a pro—instead of winging it with your fingers.
View on Amazon
Pistolet à calfeutrer Holothurian
Personne ne se vante d’avoir un pistolet à calfeutrer, mais quand vous en avez un bon, vous le remarquez. Ce modèle est solide, facile à manier et ne laissera pas de lignes grumeleuses qui crient « débutant ». Les lisseurs de joint orange inclus font le travail de finition pour vous, transformant les bavures en joints propres et professionnels. Une fois terminé, vos lignes de calfeutrage auront l’air d’avoir été faites par un pro — et non à l’arrache avec vos doigts.
Voir sur Amazon

Firecore Magnetic Torpedo Level Tool
This small level helps keep our projects straight. The Firecore 9" slips easily into the toolbox, sticks to metal with its magnets, and tells us instantly if we’ve “nailed it” or if it “needs more shims.” Compact and no-drama, it keeps shelves, frames, and cuts from looking like they belong in a funhouse.
View on Amazon
Niveau magnétique Firecore, format torpille
Ce petit niveau garde nos projets bien droits. Le Firecore 9" se glisse facilement dans la boîte à outils, colle au métal grâce à ses aimants et nous dit instantanément si on a « cloué ça » ou si ça « a besoin de cales. » Compact et sans tracas, il empêche les tablettes, cadres et découpes d’avoir l’air tout droit sortis d’une maison hantée.
Voir sur Amazon
Tool Purchases to AvoidAchats d'outils à éviter
Not every tool on the shelf is worth a spot in your precious toolbox. Skip the ones that slow you down, break too soon, or test your sanity more than your skills—the list below highlights a few worth avoiding.
Tous les outils sur la tablette ne méritent pas une place dans votre coffre. Évitez ceux qui vous ralentissent, qui cassent trop vite ou qui mettent plus à l’épreuve votre patience que vos compétences—la liste ci-dessous en présente quelques-uns à éviter.

Gorilla Glue
We’ll admit it: Gorilla Glue has fans, but using it feels like babysitting a toddler. It won’t stay put, it runs all over the place, and then when it finally dries, it puffs/foams up like it’s on steroids. Drying time? Long enough to test your patience and question your life choices. Personally, we Never use it. Period!
Colle Gorilla
On l’admet : Colle Gorilla a ses fans, mais l’utiliser c’est un peu comme garder un enfant turbulent. Ça ne reste pas en place, ça coule partout, et quand ça finit enfin par sécher, ça gonfle/écume comme si c’était sous stéroïdes. Temps de séchage ? Assez long pour tester votre patience et remettre en question vos choix de vie. Personnellement, on ne l’utilise jamais. Point final !
Epoxy Cement Countertops – A Journey Worth the Gloss
From plywood to polish, this build was a first‑time adventure—equal parts experiment, patience, and “let’s see what happens.” We learned fast, laughed often, and finished with a surface that actually invites fingerprints (the admiring kind).
- Want more inspiration? Peek at our other Special Projects
- Curious about real-world builds? Browse the Photo Gallery
- Need practical tips? Our DIY Blog is full of experiments that worked (and a few that didn’t)
- Thinking of trying your own layout? Drop us a line through our Contact Page
Final remarks: Keep it simple, stay patient, and let the finish surprise you. If our first-time run can land this smooth, yours can too.